Scaling Safely: Essential Rock Climbing Safety Tips for Beginners
Rock climbing is an exhilarating sport that combines physical prowess, mental fortitude, and a deep connection with nature. The thrill of overcoming a challenging route, the stunning views from a high vantage point, and the camaraderie with fellow climbers are unparalleled. However, like any adventurous activity, rock climbing comes with inherent risks. For beginners, understanding and implementing safety protocols is not just important – it’s absolutely critical. Safety isn’t an afterthought; it’s the very foundation upon which your climbing journey should be built.
This comprehensive guide will walk you through essential safety tips, ensuring your initial forays into the world of rock climbing are as safe and enjoyable as possible. We’ll cover everything from preparation before you even touch the rock, to critical procedures at the crag or gym, and cultivating a safety-first mindset.
I. Before You Even Touch the Rock: Preparation is Key
The journey to safe climbing begins long before you tie into a rope. Proper preparation minimizes risks and builds a strong foundation for your skills.
1. Seek Professional Instruction:
This is, without a doubt, the most important tip for any beginner. Do NOT attempt to learn rock climbing solely from YouTube videos or by simply mimicking experienced friends. Enroll in a beginner’s course at a reputable climbing gym or hire a certified climbing guide for outdoor instruction. These professionals will teach you:
- Proper Knots: How to tie a figure-eight follow-through, stopper knots, etc.
- Belay Techniques: Correct use of a belay device, brake hand discipline, taking up slack, lowering a climber.
- Gear Knowledge: Understanding different types of equipment, their function, and proper use.
- Communication: Standard climbing commands.
- Risk Management: Identifying and mitigating potential hazards.
Formal instruction provides hands-on practice, immediate feedback, and ensures you learn correct, safe habits from the outset.
2. Invest in Quality, Appropriate Gear:
While you might rent gear initially, as you progress, you’ll want your own. Never skimp on safety equipment.
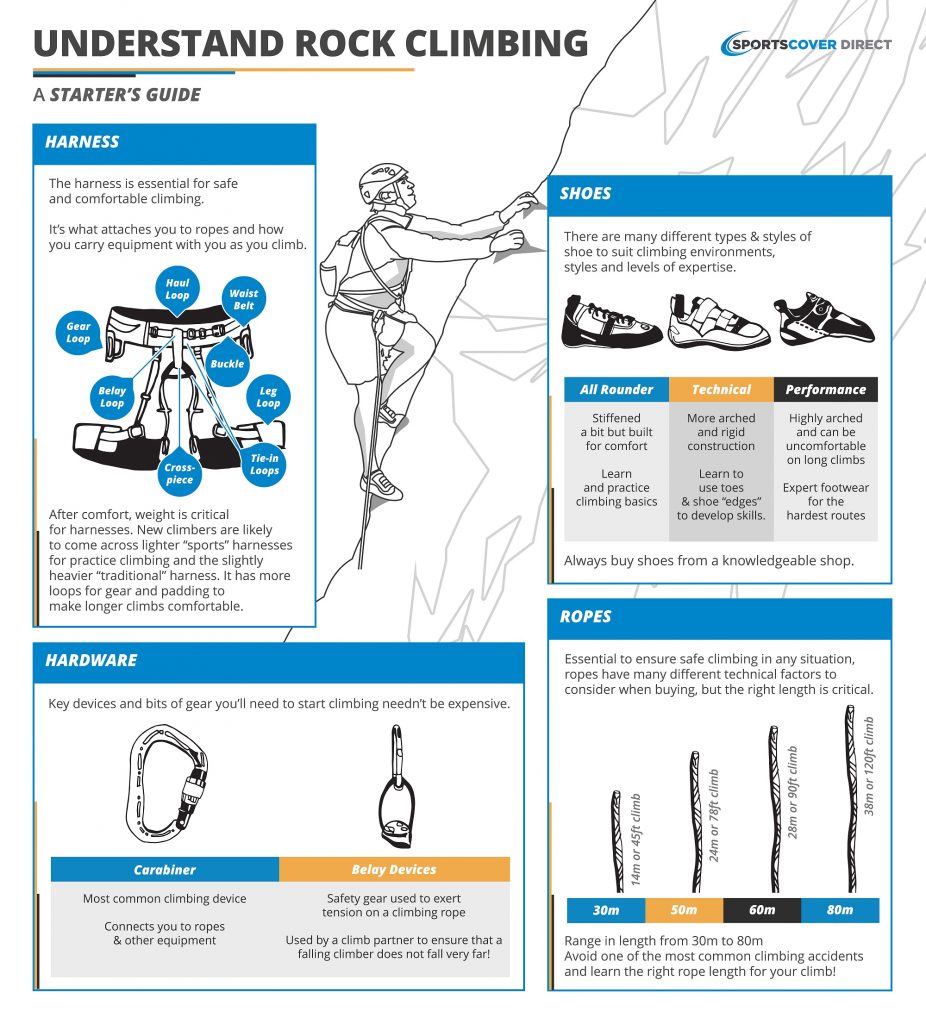
- Harness: Ensure it fits snugly and comfortably, with no twists in the webbing.
- Helmet: Non-negotiable for outdoor climbing, and highly recommended indoors. It protects against falling rocks, dropped gear, and head impacts during a fall.
- Climbing Shoes: Designed for grip and precision, they significantly enhance your climbing experience.
- Belay Device and Locking Carabiner: Essential for safely managing the rope. Learn to use the specific type you own (e.g., ATC, Grigri).
- Rope (if you’re leading or setting up top-ropes): Understand its diameter, length, and dynamic properties. Always purchase a rope specifically designed for climbing.
Always buy new gear from reputable retailers. Used gear, especially soft goods like harnesses and ropes, can have unseen damage or wear that compromises safety.
3. Learn to Inspect Your Gear Thoroughly:
Before every climbing session, and after any significant event (like a hard fall), inspect all your equipment.
- Harness: Check for fraying, cuts, or excessive wear on the webbing, buckle, and tie-in points.
- Rope: Look for nicks, flat spots, excessive fuzziness, or core shots. Feel for inconsistencies. If a rope shows significant damage, retire it immediately.
- Carabiners: Ensure gates open and close smoothly, and locking mechanisms function correctly. Check for cracks or excessive wear.
- Belay Device: Look for grooves or sharp edges from rope friction that could weaken the rope.
If you have any doubt about a piece of gear, do not use it. When in doubt, throw it out!
4. Understand Your Physical and Mental Limits:
Rock climbing is physically demanding. Start with easier routes (lower grades) and gradually challenge yourself. Pushing too hard, too fast, can lead to injury or make you more prone to mistakes. Mentally, climbing requires focus and problem-solving. Acknowledge your fears, but don’t let them paralyze you. Learn to manage anxiety and build confidence with each successful climb.
5. Check the Weather (for Outdoor Climbing):
Weather can change rapidly and unpredictably. Always check the forecast before heading to an outdoor crag. Rain makes rock slippery and increases the risk of falling. Thunderstorms bring lightning, a serious hazard. Extreme heat can lead to dehydration and heatstroke, while cold can cause numbness and reduce grip strength. Be prepared to change your plans if conditions are unfavorable.
II. At the Crag/Gym: Essential Pre-Climb Checks and Procedures
Once you’re at the climbing site, a series of crucial checks and communication protocols must be followed to ensure safety.
1. The Buddy Check (Partner Check):
This is non-negotiable. Every time you and your partner are about to climb, perform a thorough check of each other’s setup. A common mnemonic for top-rope climbing is PBUS:
- P = Partner’s Harness: Is it on correctly? Buckle doubled back? No twists?
- B = Belayer’s Belay Device: Is it set up correctly? Rope threaded properly? Locking carabiner locked?
- U = Unbraked Rope: Is there enough slack on the brake side? Is the rope free of knots or tangles?
- S = System/Tie-in Knot: Is the climber’s tie-in knot (usually a figure-eight follow-through) tied correctly and backed up (if desired)? Is the rope attached to the harness?
Perform this check every single time, even with experienced partners. Complacency is a major cause of accidents.
2. Master Your Knots:
The figure-eight follow-through is the standard knot for tying into your harness. Practice tying it until you can do it perfectly, even in the dark or under pressure. It should be snug against your harness, with a clean, well-dressed appearance, and a tail of at least 6 inches. Always visually inspect your knot and have your partner inspect it. For top-roping, understanding how to safely tie off the anchor is also critical, though this is often handled by more experienced climbers or gym staff.
3. Clear and Consistent Communication:
Using standard climbing commands ensures that both the climber and belayer are on the same page. Practice these commands until they are second nature.
- "On Belay?" (Climber asks if belayer is ready)
- "Belay On." (Belayer confirms they are ready and have the rope tight)
- "Climbing!" (Climber announces they are starting to climb)
- "Climb On." (Belayer confirms they are watching and ready)
- "Take!" / "Take Up!" (Climber asks for tension on the rope, usually to rest or prepare for a fall)
- "Got You!" (Belayer confirms tension on the rope)
- "Lower!" (Climber requests to be lowered down)
- "Lowering!" (Belayer confirms they are lowering)
- "Off Belay?" (Climber asks if belayer is taking them off belay)
- "Off Belay." (Belayer confirms the system is disengaged)
Speak loudly and clearly, especially in noisy environments or outdoors where wind can carry away sound.
III. During the Climb: Focus and Awareness
Once you’re on the wall, maintaining focus and awareness is paramount.
1. Stay Focused and Present:
Distraction is dangerous. Keep your attention on your next move, your body position, and your belayer. Avoid idle chatter or looking around too much while climbing. Be aware of other climbers around you, especially if climbing outdoors where falling rocks or dropped gear are a concern.
2. Trust Your Gear and Your Belayer:
Your equipment is engineered to withstand immense forces, and a properly trained belayer is your lifeline. Learn to trust the system. This mental trust allows you to commit to moves and climb more fluidly, rather than being gripped by fear. Practice falling in a controlled environment (like a climbing gym) to build this trust and learn how to fall safely.
3. Maintain Communication:
As discussed, continuous communication is vital. If you need a take, are struggling, or are approaching the top of the route, clearly communicate with your belayer. Don’t assume they know what you’re thinking or doing.
4. Three Points of Contact (for Beginners):
While not a rigid rule for advanced climbers, for beginners, aiming for three points of contact (two hands and one foot, or two feet and one hand) with the rock or holds provides stability and control. This technique helps you move deliberately and reduces the risk of an uncontrolled swing or fall.
IV. The Belayer’s Crucial Role: Your Partner’s Life in Your Hands
The belayer is responsible for the climber’s safety. This role demands unwavering attention and proper technique.
1. Constant Vigilance:
The belayer must never be distracted. No phone calls, no chatting with others, no looking away. Your eyes should be on the climber, anticipating their moves and potential falls.
2. Brake Hand Discipline:
The brake hand should never leave the rope. It must always be in a position to apply friction to the belay device and stop a fall. This is the golden rule of belaying.
3. Smooth Takes and Controlled Lowers:
Practice taking up slack smoothly to avoid giving the climber a "hard catch" (a sudden jolt) or leaving too much slack in the system, which results in a longer, harder fall. When lowering, do so at a consistent, controlled speed, ensuring the climber descends gently to the ground.
4. Anticipate the Climber:
A good belayer anticipates when a climber might fall or need a take. They’re ready to react instantly, pulling in slack or bracing for impact.
V. Post-Climb Procedures and Mindset
Safety extends beyond the actual climb itself.
1. Safe Lowering or Rappelling:
When the climb is finished, the belayer must lower the climber safely and slowly. If rappelling (a technique for descending the rope, often used for multi-pitch climbs), ensure you understand the system perfectly, use a backup knot (like a prusik), and always double-check your setup. This is an advanced skill that should only be learned from a certified instructor.
2. Untying and Packing Up:
Ensure you are fully off belay and on solid ground before untying your knot. Coil your ropes properly to prevent tangles and damage. Inspect all gear again before packing it away, noting any wear or damage that might require retirement or maintenance.
3. Leave No Trace (for Outdoor Climbing):
Respect the environment. Pack out everything you pack in, including trash and food scraps. Minimize your impact on the rock and surrounding vegetation. Stick to established trails.
4. Never Stop Learning and Questioning:
The climbing world is constantly evolving, with new techniques and gear. Remain a student of the sport. If you’re ever unsure about a technique, a piece of gear, or a situation, ask an experienced climber or instructor. Never feel embarrassed to ask questions – it’s far better than making a dangerous assumption.
5. Progress Gradually and Be Patient:
Rock climbing is a journey, not a race. Celebrate small victories, learn from your falls, and enjoy the process. Don’t rush into harder grades or more complex techniques before you’ve mastered the basics. Patience and consistency will not only make you a better climber but a safer one too.
Conclusion
Rock climbing offers incredible rewards: a sense of accomplishment, physical fitness, mental clarity, and breathtaking experiences in nature. By prioritizing safety from day one, you ensure that these rewards can be enjoyed for years to come. Remember, safety is a shared responsibility between you and your climbing partner. Invest in proper instruction, quality gear, meticulous checks, clear communication, and a continuous learning mindset. Embrace these essential safety tips, and you’ll be well-equipped to embark on a thrilling and secure rock climbing adventure. Climb high, climb hard, and above all, climb safely.


